
Now that we have mentioned what CPU you must get, next could be the elimination and installation process of upgrading your CPU. First you need to power down your computer absolutely, remove all cords attached to it, and set it out in a start workspace, ideally a wood table. You will also require a Philips and flathead screw driver and before you open your personal computer or anything, be sure to feel a steel area to floor your self and prevent any static electricity.
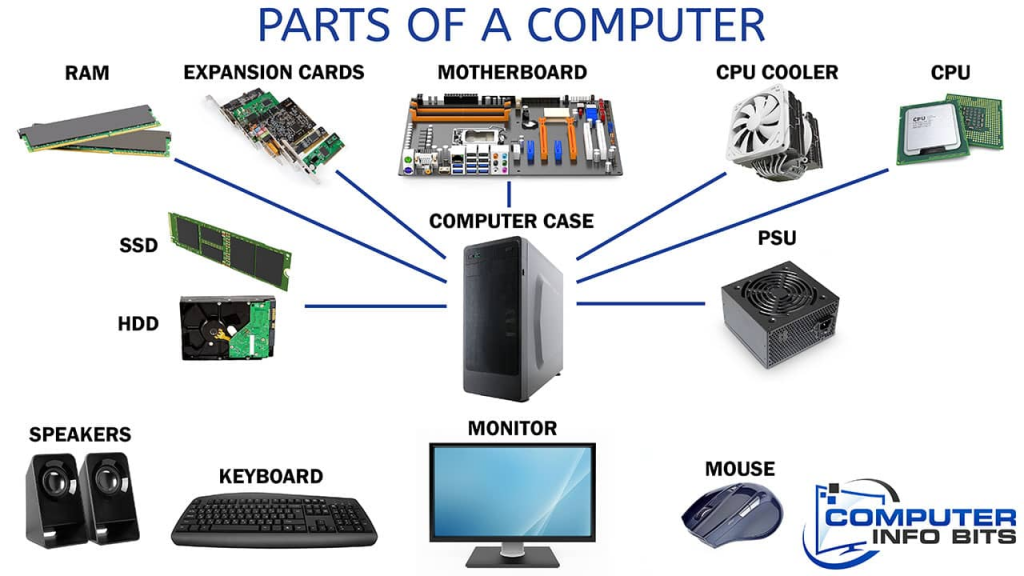
With everything all set, unscrew or go off your pcs situation cover to obtain a search inside of one’s computer. Once you can see inside, you might find your motherboard, which will be the major enterprise table in the centre that attaches every part together. When you look at the motherboard, kind of near the middle or prime remaining, you will dsicover a square with a metal heatsink and a supporter on top of it. That is your CPU and the very first thing you need to do is take away the heatsink. This is a really complicated and risky section of improving your CPU, because the heat sink is extremely firmly mounted on top of your CPU. The thing you need to accomplish first is unplug the fan’s power. To achieve this you should just find the cable that is going from the supporter to the motherboard and disconnect it. Then next please study the heat drain latching mechanism and unlatch it. Some heat sink latches are different, therefore that is why I cannot give you a detail by detail information on how to unplug it.
When unlatching the heatsink you wish to be sure to maybe not scratch the motherboard or even feel it together with your screwdriver. It could be difficult, but you cannot try this or your motherboard most likely won’t perform anymore. This is why many folks are scared to accomplish it there selves, but I assure you, if you take it slow and workout caution you will do only fine.After you heatsink is gone and your CPU is showing, you will have the ability to remove it. To achieve this, you just have to raise the sealing handle up (vertical) then only get a grip of the CPU and raise it down and out of its socket. CPU sockets and slots because the 1990’s use zero force installation, this means the CPU only sits within and number force is required to mount or uninstall it.Now that your previous CPU has been taken out you can put a fresh one in. First just be sure that the locking lock is in the up position prepared for your new CPU. Now that you will be prepared you can place your new CPU.
Processors are fragile, therefore whenever you try this don’t attempt to stack it in there. Just remember that CPU’s use zero power for installation, so you should just set your CPU in there. When you do though you’ll need to find out which way you’ll need to set it. Every CPU includes a level on one of many corners and wants to match up to the stage where in actuality the CPU case has a notch. Then when the CPU is in place, precisely, it’s simple to drive the sealing attach straight back down.Next you’ll need to put the heatsink back together with it, but first you need to discover your CPU’s die and put the thermal substance that got along with your CPU. Your CPU’s die is the grayish looking sq that’s lifeless center along with your CPU. Following your thermal substance is correctly used, you are prepared to place the heatsink on. Make sure the heatsink is experiencing the proper direction, and then carefully remain it on top of the CPU. The thermal ingredient may support your CPU involving the heatsink so you should not be worried about scratching it.
Now could be the tough part all over again, latching your temperature sink right back on. Just like you unlatched it to eliminate your CPU, you should do the alternative to lock it straight back on. As I claimed before, invest some time and workout warning when doing this which means you don’t damage your mother board.Now just catch the CPU fans power right back up by inserting the energy line back into the correct spot in your motherboard, where it had been before. This really is easy since frequently the hookup spot on your mom board is marked “CPU FAN” and is located correct next to the CPU’s location.Finally you ought to check always over your projects and ensure the heatsink is safely secured, all wires are guaranteed, and everything seems good. If all is excellent, then set your situation cover straight back on and mess it in. Then you can certainly hook all of your computer wires right back up again and power on your own computer. Dust off both hands and terry yourself on the rear because you’ve only accomplished your first CPU upgrade.
Your CPU, also known as the Key Processing System, is actually the center of your computer and without it we would be in the dark ages. Just as the human heart pushes body through the body, your CPU pushes information through the computer and the similar components which are inside of it. This is the reason your CPU can be a option breaker when it comes to your computers speed. Devoid of enough control energy may cause your personal computer to not work correctly and fail, and a lot of energy is…well merely a spend of money.
What you want to locate is the right pace for you and the plug form for the computers mother board. A lot of people just purchase a new pc when it becomes to gradual, but they are wrong in doing so because a simple CPU upgrade will bring it straight back up to speed with recent software and components. So before you go buying a new computer only for more pace, or employing anyone to upgrade your CPU for you personally, consider performing a CPU
https://cpu-compare.com/benchmark/cinebenchr20
update yourself. Now I understand everything you are planning, “I know nothing about pcs and I am afraid I will mess something up.” Well no need to fret, your in the arms of a skilled pc specialist who’ll coach you on each stage to remove your old CPU and install a new one.
First we truly need examine what CPU you’ll need to buy and the speed it will be. CPU’s connect with your pcs motherboard, which is basically the big circuit board in your computer that links everything together. Your CPU may sit inside of a socket, but what socket type you will need is where it gets difficult. There are numerous various plug types and only two major CPU organizations, Intel and AMD. If your computer is prepared with an Intel CPU, then you definitely frequently can only just change it with yet another Intel CPU, unless it is a vintage plug 7 that may support both. The plug types Intel employs are position 1 for Pentium two and three chips, outlet 370 for Celeron A’s and plug 478 for Pentium 4’s.AMD uses position A for Athlon’s, plug 940 for 64 touch Opteron and Athlon numerous CPU motherboards, plug 939 for 64 bit Athlon’s and outlet 754, which will be fundamentally a cheaper outlet for 64 bit Athlon’s.Now needless to say they are the present slot and plug forms as I’m publishing this article, but obviously technology is obviously advancing and in the foreseeable future I promise you new types will come out.
Ok, so after all that you may be wondering how do I learn the slot or outlet type that can be used in my pc? Effectively first I would recommend you look at your computer or mom boards handbook that came with it, and study by what plug type(s) it helps and what processors perform most readily useful with it. If you don’t have an information, then I suggest you find out what model is currently in your personal computer and match it with the correct plug type that I discussed above.Since you’ve determined the proper outlet form for your CPU, let’s discuss speed. A processors speed may be tested in MHz or GHz, and GHz could be the fastest. Processors that only go MHz are rarely found in pcs nowadays, specially maybe not new ones. The very fact of the problem is that MHz processors only can’t reduce it for today’s pc programs and functioning systems. Plus, one thousand MHz equals one GHz, so you can see the big pace difference between the two.
The total amount of GHz speed you ought to get is dependent upon what you should be utilizing your pc for. If you plan on utilizing your pc simply for regular home use, like surfing the internet, performing your fees and different modest material, then you must only get a model that is between 1 and 1.5 GHz. If you use lots of programs, that need lots of information processing, you then must get a processor that is around 2 GHz in speed. For all you computer participants available, I am aware you would like something that will produce your games load faster, enjoy mixture and look greater, therefore I recommend you receive a processor that is at least 3 GHz or even just a little less or more.Well that proves the first part of this short article; in the 2nd part we shall discuss the removal of your old CPU, and the installing your brand-new one.